Turning On Debugging on Kindle Fire Device
Having recently purchased a Kindle Fire and also because I recently started learning how to program games for Android I decided to see if my play projects would run on the Kindle Fire. Much to my dismay there was no “Allow Debugging” setting on the Kindle Fire like there is with my DroidX phone. Also my Kindle Fire was not recognized by my Eclipse IDE as a device. After hunting for an answer I found how to do just that from information on the following links
http://blog.actlocalmedia.com/2011/11/developing-on-kindle-fire.html
In the first link you will find a post by AdmiralUD that outlines the entry you must make for the Android drivers.
Because I had to piece meal the solution on my own and because it was somewhat confusing at first, I decided to share a more comprehensive solution to the problem.
I will caution you that before you start developing on the Android you will need to download the Android SDK as well as the Eclipse IDE and the Java SDKS. Once you do that you will also have to install the USB drivers available through the android SDKs.
You can install the USB drivers via the Android SDK’s SDK Manager. You can find more information about installing the USB drivers at the following link http://developer.android.com/sdk/adding-components.html. You can get the the Java SDK for free and also the Eclipse IDE.
So let’s get started!
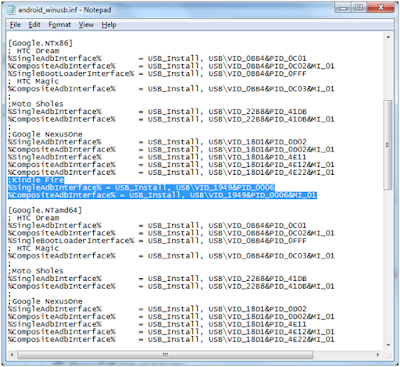
1 1. First find the file named android_winusb.inf and open it with notepad in your android-sdks folder. Mine is located at C:\Users\fernando\android-sdks\extras\google\usb_driver. Then add the following entry under [Google.NTx86] and also under [Google.NTamd64] and save the file.
;Kindle Fire
%SingleAdbInterface% = USB_Install, USB\VID_1949&PID_0006
%CompositeAdbInterface% = USB_Install, USB\VID_1949&PID_0006&MI_01
12. Then navigate to the file name adb_usb.ini in your .android folder. Mine is located under the path C:\Users\fernando\.android. Ad the entry 0x1949 in a new line and save the file. This is the ID for the Kindle device.
Before you move on the next step connect your Kindle via USB. Once you do that go to “Computer” and select properties to navigate to the device manager. You should see the Kindle Fire device as listed below.
Right click on the Kindle device and select "Properties" from the context menu. Then open the Driver tab as shown below to get ready to update the driver.
Click the Update Driver button and on the next window select “Browse on my computer for driver software”
On the next screen browse to the location where your INF file is located as shown below and click OK (this is the file that modified earlier with the Kindle Fire entries for the USB driver). This will update your drivers.
If you get the Windows Security screen select “Install this driver software anyway”. Once the driver finishes installing open the windows command prompt and navigate to the folder where your adb.exe file is located. In my case that’s located in the path C:\Users\fernando\android-sdks\platform-tools. The easiest way for me to do this to navigate there with the windows explorer and then copy and paste the path after the CD command as shown below. You need to navigate there in order to execute the adb.exe applicatio from the command line.
Now run the command adb devices (as shown below) and you should see your device listed. If you don’t see your device listed try killing the adb service and restarting it by using the commands:
adb kill-server
adb start-server
At this point you can start Eclipse and select “Run Configurations” to run this program manually.
And that is all there is to getting your Eclipse IDE to recognize your Kidle Fire device.
Happy coding!
adb kill-server
adb start-server
At this point you can start Eclipse and select “Run Configurations” to run this program manually.
And that is all there is to getting your Eclipse IDE to recognize your Kidle Fire device.
Happy coding!


Comments
Although my device shows up with adb devices, I don't see it in Run Configurations in the Target tab. Can you recommend anything else for me to try?